Creamy Vanilla Dream Pudding Cups: A Delightful Dessert
When it comes to dessert, few things can rival the comforting embrace of a creamy pudding. The Creamy Vanilla Dream Pudding Cups are a perfect blend of simplicity and elegance, making them an ideal choice for any occasion. Whether you are hosting a dinner party or simply craving a sweet treat at home, this dessert promises to satisfy both children and adults alike. The rich vanilla flavor and velvety texture evoke feelings of nostalgia, reminiscent of childhood favorites and family gatherings. This article aims to provide a comprehensive guide to preparing these delicious pudding cups, including insights into the essential ingredients and variations that can elevate this classic dish.
Understanding the Ingredients
To create the perfect Creamy Vanilla Dream Pudding Cups, it’s important to understand the role of each ingredient in the recipe. Each component contributes to the overall taste and texture, ensuring that the pudding is not only delicious but also has that coveted creamy consistency.
Whole Milk: The Foundation of Creaminess
Whole milk is the cornerstone of this pudding recipe, providing the rich and creamy texture that makes it so indulgent. The higher fat content in whole milk is critical, as it enhances the mouthfeel and helps create a luxurious pudding. The fat in the milk carries flavor and contributes to the overall richness, ensuring that each spoonful is satisfying and delightful. Skim or low-fat milk may result in a less creamy pudding, so for the best results, stick with whole milk.
Granulated Sugar: Sweetness and Structure
Granulated sugar is not just a sweetener in this recipe; it also plays a crucial role in the pudding’s structure. Sugar helps to dissolve the cornstarch, facilitating the thickening process as the mixture heats. This ensures a smooth and velvety pudding rather than a grainy texture. The right balance of sugar is essential—it should provide sweetness without overwhelming the delicate vanilla flavor.
Cornstarch: The Thickening Agent
Cornstarch is the unsung hero of the Creamy Vanilla Dream Pudding Cups. This thickening agent is what transforms the liquid mixture into a creamy pudding. When heated, cornstarch swells and absorbs liquid, creating a thick, cohesive texture. It’s essential to use the correct amount, as too little will result in a runny dessert, while too much can lead to a pudding that is overly firm. The key to success lies in mixing the cornstarch with sugar before incorporating it into the milk, as this ensures an even distribution and prevents lumps.
Salt: Enhancing Flavor
While it may seem counterintuitive to add salt to a dessert, a pinch of salt is crucial in balancing the sweetness and elevating the flavor profile. Salt enhances the overall taste and brings out the natural flavors of the vanilla and dairy, resulting in a more complex and satisfying pudding. It’s a small addition that makes a significant impact on the final dish.
Unsalted Butter: For Creaminess and Depth
Adding unsalted butter to the pudding mixture not only contributes to its creaminess but also adds a layer of richness that enhances the overall flavor. Butter has the ability to provide a luxurious mouthfeel, making each bite feel indulgent. Using unsalted butter allows for better control over the dish’s saltiness, ensuring that the flavors remain perfectly balanced.
Pure Vanilla Extract: The Star Flavor
No vanilla pudding is complete without the star ingredient—pure vanilla extract. The quality of the vanilla extract can make or break the pudding, so it’s essential to choose a high-quality product. Pure vanilla extract is made by steeping vanilla beans in alcohol, which extracts the flavorful compounds, resulting in a robust and authentic flavor. Imitation vanilla extracts may save a few dollars, but they lack the depth and complexity that pure extract provides.
Optional Garnishes: Elevating Presentation and Taste
To take your Creamy Vanilla Dream Pudding Cups to the next level, consider adding garnishes. Whipped cream is a classic topping that adds a light and airy contrast to the rich pudding. Ground cinnamon can introduce a warm, aromatic element, while chocolate shavings or sprinkles can add a fun, decorative touch. Fresh berries or mint leaves can provide a pop of color and freshness, elevating both the aesthetic and flavor profiles of this delightful dessert.
Step-by-Step Guide to Making Creamy Vanilla Dream Pudding Cups
Now that we’ve explored the essential ingredients, it’s time to dive into the step-by-step process of making your Creamy Vanilla Dream Pudding Cups. Following these clear instructions will help you achieve the perfect pudding every time.
Preparation: Gathering Ingredients and Tools
Before you start cooking, it’s essential to prepare your workspace and gather all necessary ingredients. For this recipe, you will need whole milk, granulated sugar, cornstarch, salt, unsalted butter, and pure vanilla extract. Additionally, ensure you have the following tools on hand: a medium saucepan, a whisk, measuring cups and spoons, a heat-resistant spatula, and individual serving cups for the pudding. Having everything ready will make the process smoother and more enjoyable.
Combining Dry Ingredients: Ensuring a Smooth Base
Begin by combining the dry ingredients in a medium saucepan. Measure out the granulated sugar, cornstarch, and salt, then add them to the saucepan. Using a whisk, mix these dry ingredients thoroughly until they are well combined. This step is crucial, as it helps to avoid lumps in your pudding. Whisking the dry ingredients together ensures that the cornstarch is evenly distributed, allowing for a smooth base when you add the milk.
Incorporating Milk: Gradual Mixing for a Smooth Texture
Next, it’s time to incorporate the whole milk into the dry mixture. To achieve a smooth texture, pour in the milk gradually while continuously whisking. This method helps to prevent clumps from forming and ensures that the cornstarch properly dissolves into the liquid. Once all the milk is added, continue whisking until the mixture is smooth and free of lumps. This step is vital for achieving that creamy consistency that is characteristic of a great pudding.
With this foundation set, the next stages will focus on cooking the mixture to achieve the perfect pudding consistency. Stay tuned for the subsequent steps that will guide you through the cooking process, adding flavor, and ultimately serving up these delightful Creamy Vanilla Dream Pudding Cups.
Gradual Milk Addition: Ensuring a Lump-Free Mixture
When making the Creamy Vanilla Dream Pudding, one of the first critical steps is the incorporation of milk into the dry ingredients. To achieve a smooth and creamy consistency without lumps, it’s essential to add the milk gradually. Begin by whisking together the sugar, cornstarch, and salt in a medium-sized saucepan. Once these dry ingredients are well blended, slowly pour in the milk while continuously whisking. This gradual addition allows the cornstarch to dissolve smoothly, preventing any clumps from forming. If you pour the milk in too quickly, it can create a lumpy texture that is difficult to rectify later on.
Cooking the Mixture: The Importance of Constant Whisking
Once all the milk has been added, it’s time to cook the mixture. Place the saucepan over medium heat and continue to whisk constantly. This step is crucial for two reasons: achieving the right consistency and preventing scorching. As the mixture heats, the cornstarch will begin to thicken, transforming into a luscious pudding. However, if left unattended or stirred inadequately, the pudding can scorch at the bottom, leading to an undesirable burnt flavor.
Keep a close eye on the mixture, and don’t be afraid to increase or decrease the heat as necessary to maintain a gentle simmer. The goal is to achieve a thick, custard-like consistency without bringing it to a full boil, which can ruin the texture.
Adding Butter and Vanilla: Creating Depth of Flavor
As the pudding thickens and you can see that it has reached the desired consistency (usually around 5-7 minutes of cooking), it’s time to remove the saucepan from the heat. Immediately add in the unsalted butter and pure vanilla extract. This is a vital moment in the pudding-making process; the heat from the pudding will melt the butter, adding a rich creaminess, while the vanilla extract enhances the flavor profile. Stir well to ensure the butter is fully melted and incorporated, resulting in a velvety pudding base that is bursting with flavor.
Cooling and Chilling: Setting the Pudding
After incorporating the butter and vanilla, it’s important to cool the pudding to allow it to set properly. Transfer the pudding to a bowl and place a piece of plastic wrap directly on the surface of the pudding. This step is critical because it prevents a skin from forming on top as it cools. Let the pudding cool at room temperature for about 30 minutes, then refrigerate it for at least two hours or until it is fully chilled and set.
Final Touches: Serving and Enjoyment
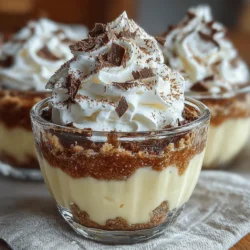
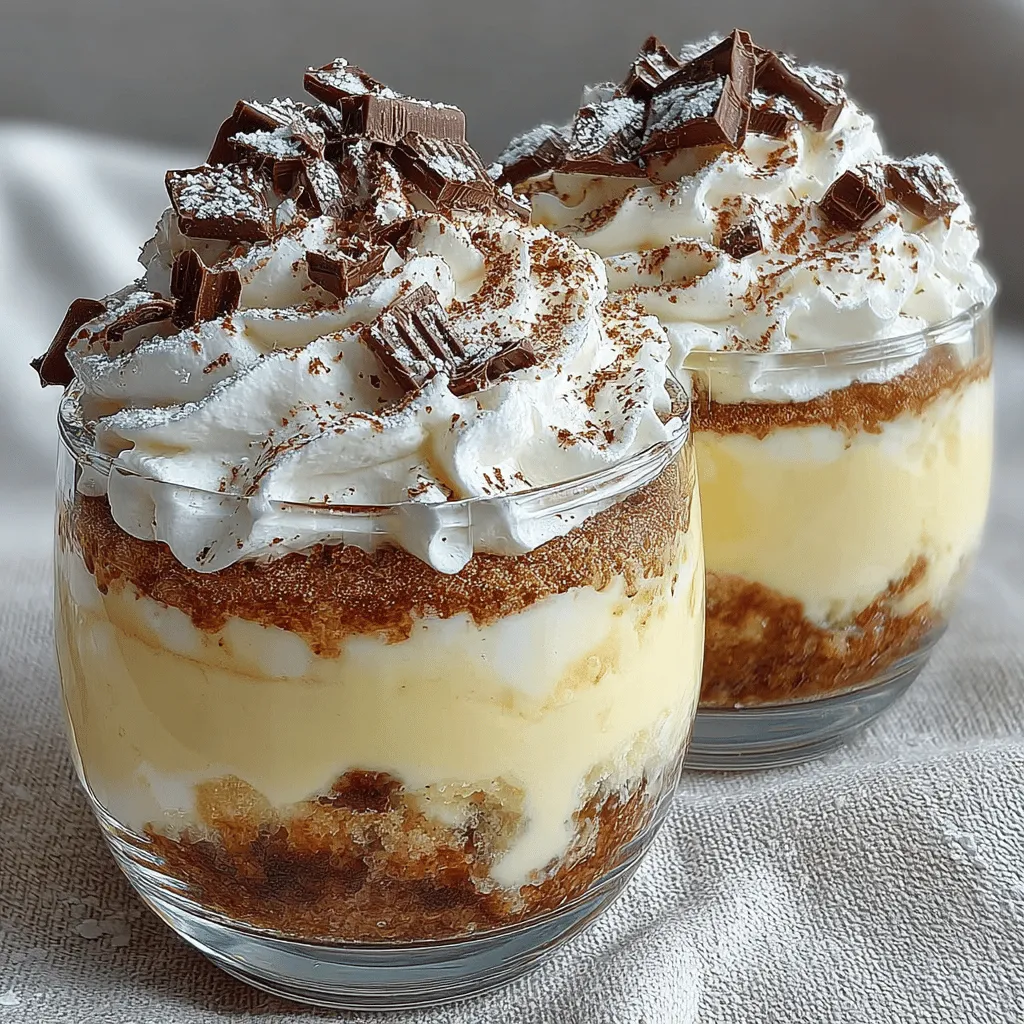
Now comes the fun part—serving your Creamy Vanilla Dream Pudding Cups! Once chilled, give the pudding a gentle stir to smooth it out. Spoon the pudding into individual serving cups or bowls. For an elegant touch, top each cup with a dollop of freshly whipped cream. You can either whip your cream with a touch of sugar for added sweetness or leave it plain for a delicious contrast to the rich pudding.
Feel free to get creative with garnishes! Fresh berries, crushed cookies, or a drizzle of caramel sauce can elevate your dessert, making it not only a treat for the palate but also a feast for the eyes.
Exploring Variations: Creative Twists on the Classic Recipe
One of the best aspects of Creamy Vanilla Dream Pudding Cups is their versatility. Once you have the base recipe mastered, you can easily experiment with a variety of flavors and presentations.
Flavor Variations: Beyond Vanilla
While vanilla is the classic choice, consider swapping out the vanilla extract for other flavors to create delightful alternatives. For chocolate pudding, simply add cocoa powder to the dry ingredients, adjusting the sugar to taste. For butterscotch, use butterscotch chips melted into the pudding mixture. You can even explore fruit-flavored puddings by incorporating pureed fruits such as strawberries or bananas into the base.
Healthier Alternatives: Making it Lighter
If you’re looking for a lighter version of this dessert, consider reducing the sugar or using alternative sweeteners like honey or maple syrup. Additionally, you can substitute whole milk with almond milk or coconut milk for a dairy-free option without compromising too much on flavor and texture. These adjustments make the pudding suitable for various dietary preferences while still delivering a deliciously creamy experience.
Presentation Ideas: Elevating Your Dessert
Presentation is key in making any dessert more enticing. Try layering the pudding with fresh fruit, such as sliced peaches or berries, for a colorful contrast. You can also serve it in elegant glasses or jars to enhance its visual appeal. For texture, consider adding layers of crushed graham crackers or cookies between layers of pudding. This not only adds a delightful crunch but also brings a new dimension to the classic pudding experience.
Nutritional Insights: Understanding the Benefits
As with any dessert, it’s essential to consider the nutritional aspects of the ingredients used in Creamy Vanilla Dream Pudding Cups.
Caloric Content and Portion Control
Each serving of this pudding generally contains around 200-250 calories, depending on the specific ingredients used. To enjoy this treat without overindulging, consider serving smaller portions, especially if you’re pairing it with additional toppings like whipped cream or chocolate shavings.
Nutritional Benefits of Whole Ingredients
Using whole ingredients in your pudding contributes to its overall nutritional profile. Whole milk, for instance, provides essential vitamins and minerals, including calcium and vitamin D, which are beneficial for bone health. Furthermore, using natural ingredients without additives enhances the pudding’s flavor and nutritional value compared to processed alternatives.
Conclusion
The Creamy Vanilla Dream Pudding Cups are more than just a delightful dessert; they are a timeless favorite that resonates with people of all ages. This recipe is not only straightforward to prepare but also opens the door to creative expression through various flavor adaptations and beautiful presentations.
Whether you enjoy this pudding at a family gathering, as a comforting weeknight dessert, or as a special treat for yourself, it encapsulates the joy of homemade indulgence. We encourage you to try your hand at making these creamy delights, savoring the rich flavors and the happiness they bring to your dining table. So gather your ingredients, unleash your creativity, and enjoy the satisfaction of crafting a dessert that is both simple and extraordinary!